The eyelet and lace-print Laurel

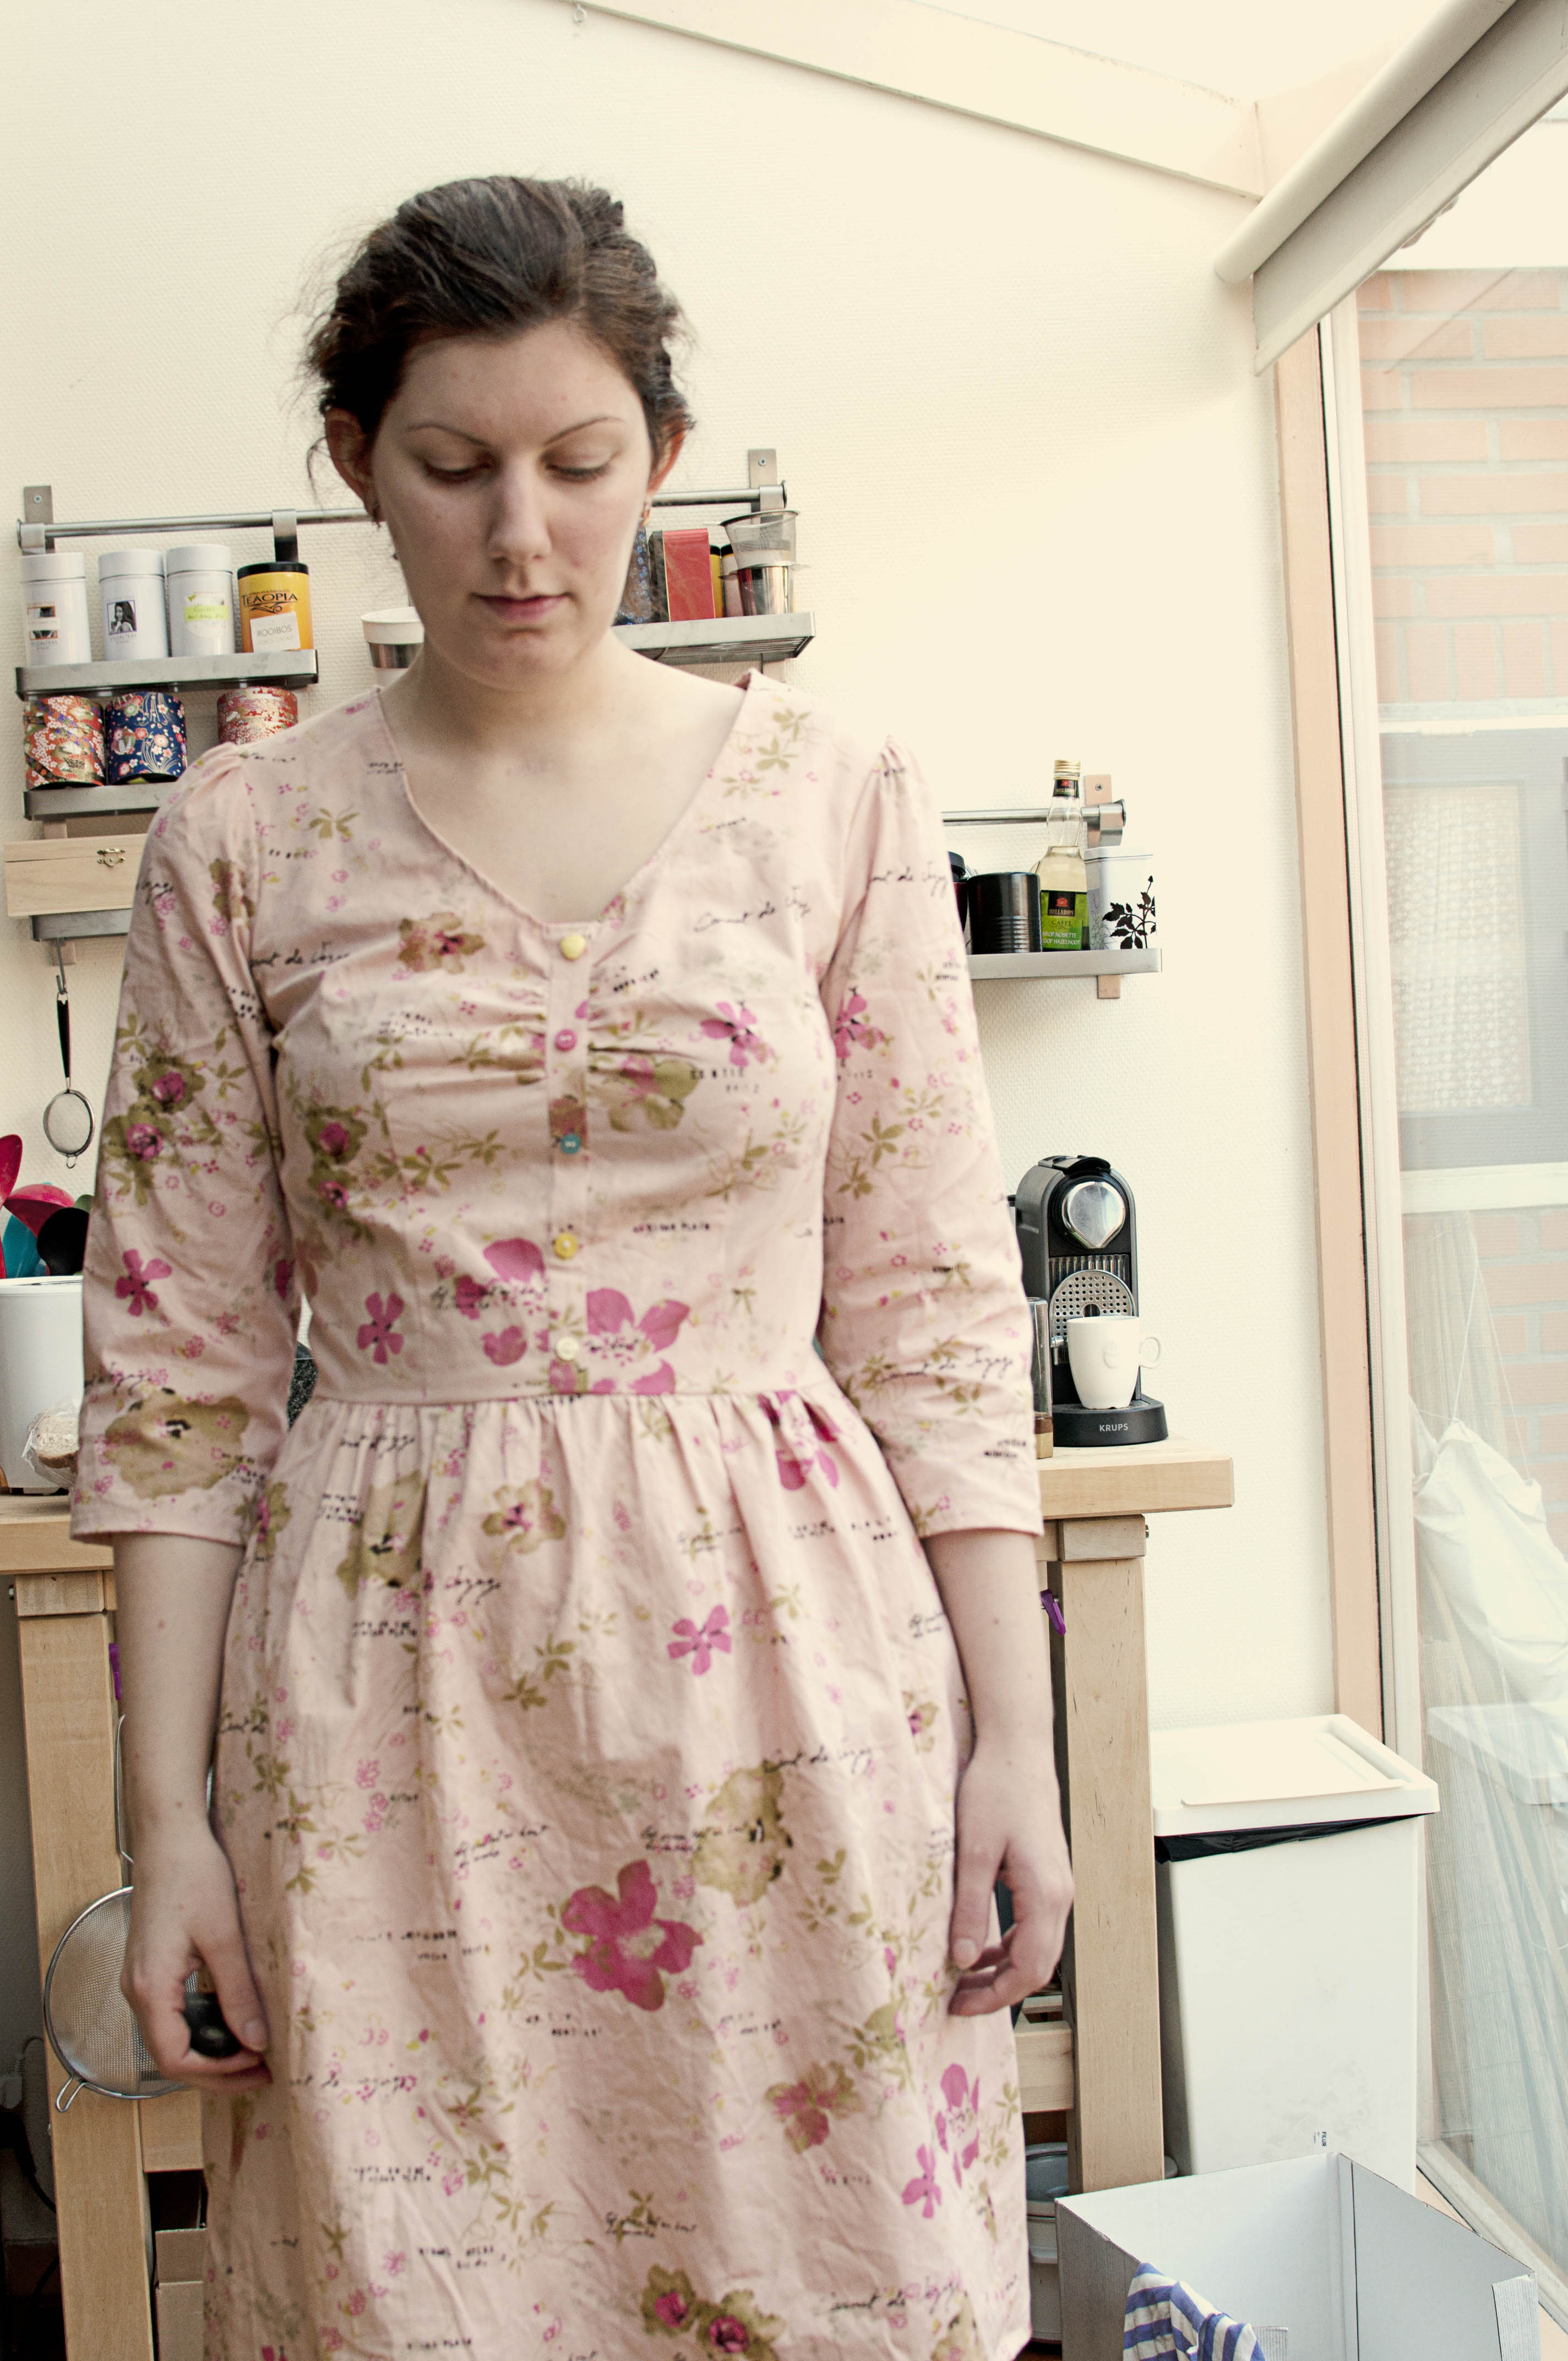
When I read about Colette pattern’s contest, I immediately thought: I must enter! I bought the pattern when it was first introduced, at 10% off. I printed it out and traced it in the space of 24 hours I think. The following day, I chose an amazing paisley printed satin, and got to cutting it out. I even put tracing paper underneath the fabric so it wouldn’t slip and slide! I did french seams! I hand-picked a side zipper! I made adorable cap sleeves! Then I got to making the bias tape and suddenly it became part of my UFO pile. I must have spent hours on that stupid tape. I don’t have a bias-tape maker, and I had to make my own starch spray to stabilize the tiny strips of fabric, otherwise it would not press at all.  I sewed the bias tape to the bottom half of one of the sleeves, and then gave up.  All that’s left is the neckline and the hem. Actually, the hem is half way done. I’m doing a narrow seam, so it’s already got a line of stitching close to the fold, I’ve trimmed it, and all that’s left is turning it over and stitching again. It’s scandelous, really.

Half way through April, I decided to get my ass in gear and have another go at it. After perusing google images, I was inspired by a silk shift dress design by (?), which was color-blocked in navy and coral. And since I recently purchased a french curve, I was prepared to take on some simple pattern design.

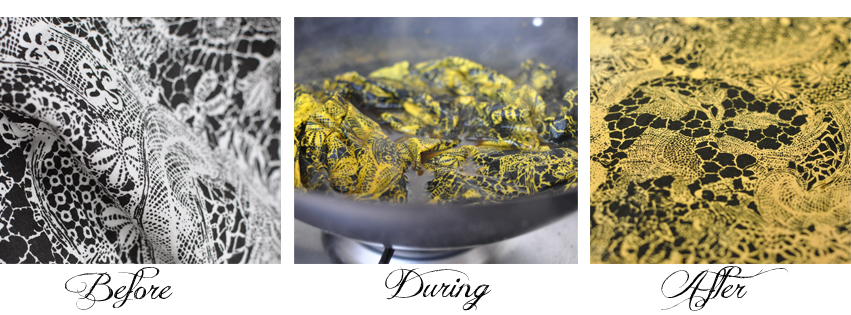
I chose two fabrics from my stash: A black eyelet and a printed lace, which I hand-dyed in my wok pan! I used tumeric to dye it, an all-natural dye that gives a lovely yellow colour. And those of you who love Indian food, you know how bad it can stain your clothes.

fabric dyeing process

So I cut out the pieces of my newly designed Laurel pattern and I sewed it up really quickly, even with all of the tricky corners in the blocking. I was just about finished, then I tried it on and realized that I hadn’t put the sweetheart neckline far enough down! I didn’t even take pictures to show you before. It just looked horrible. Like I had a flat DD chest or something. So I picked out the top part and re-cut the pattern pieces. I had plenty eyelet still, but I had to be careful with the yellow fabric because I did not have enough left.  It all worked out!

lovely laurel

Like all the reviews say, this dress comes together very quickly, even with my blocking modifications. I also french seamed all of the seams except for the shoulder seams because I reduced the seam allowance. When I tried on the dress, the arm holes were too tight, so I did a 1cm seam instead of 1.5cm.

I used two different sizes of bias tape on the dress. I used a narrow one on the arm holes and a wider one for the neckline. I ran out of the narrow one after the arm holes, which is why I switched. I think it looks pretty good, though.

It was so lovely taking pictures out in the sun. It seems like everywhere in the world, the winter was hanging on as long as it could. It’s the first time I’ve experienced the grass turning brown in The Netherlands since I moved here 9 years ago.

The back is beautiful, I think. I eliminated the zipper because in making the satin version, I noticed there was enough ease to be able to pull it over my head.

I hemmed it with a double fold.  I originally wanted to use the narrow bias tape to keep most of the length, but as I said, I ran out, and the wide one was just too wide in my opinion. The length is ok, though. A nice summery length.

But I am seriously thinking that I will never sew with eyelet again because everytime the needle went through the embroidery, it stopped or slowed down. I had to replace my needle after this project. And I think I might add darts in front one of these days to make it a bit more form-fitting. It’s a bit too loose in front for my taste.

Thanks for stopping by.

Almost weekend post

I have been pretty busy these last couple of weeks. I’m really trying to finish off my thesis before I leave for Canada in two weeks, or at least have a very good first draft, because the end of the school year is drawing near and if I don’t finish, well, let’s just say I’ve taken long enough to finish my masters. No more excuses! And when I’m not working on my thesis, I’m sewing, or doing something sewing-related. When I’m uninspired to write, I’ve been tracing patterns. I’ve traced the Ginger skirt, the Ginger bodysuit, and the perfect nursing top all in the last couple of weeks.

And in non-school and non-sewing news, I have another new nephew! He was born on Monday and I got to visit him on Tuesday already. I went to visit him and his proud parents along with my partner and his brother, girlfriend and their son. Everything went well with the birth, so the parents were very relaxed and we all got to take turns holding him. The only problem with this picture is now the pressure is on for us to be next. But we are not ready to be next!

I made a couple of tops for my sister-in-law that she wore all through her pregnancy. I love that she appreciates what I made for her. So I sewed up a nursing top for her from Megan Nielsen’s maternity line.

That box in the corner is my UFO pile.

However, I’m a little bit nervous that it won’t be very good for nursing. I ordered the fabric online, and I didn’t read it very carefully. The fabric I used is a jersey voile, therefore SEE THROUGH. Not very modest for a new mom, is it?!. Thankfully, I also ordered a brown jersey that matches perfectly, so I used that to underline it. In doing so, I think some of the stretchiness was compromised. They are both only two-way stretch, so they weren’t very stretchy to begin with. If I make it again, I’ll make sure to use 4-way stretch instead.

I just hope that she loves it enough to wear it anyway! The dressform isn’t pregnant or has post-baby belly and it looks great on it, doesn’t it? I hope it is something that she can wear post-nursing as well. We’re going to their place next week to build a fence since they also recently moved into a new house. So we’ll see…

Summary:

Fabric: 1.5m jersey voile, 1.5m polyester jersey
Notions: thread
Hours: about 3-4 (underlining takes extra time!)
Cost: The fabric cost €12. I know, I’m supposed to be stashbusting, but I can’t help splurging on others! I used my standard black thread though. I get 1000m at a time, so I don’t go through it so quickly.
Make it again?: Yes! I’m already making another top for a friend. Also not too stretchy… oops. It’s the thought that counts, right?

Have you made the MMM pledge?

‘I, Joanne of Zoe Livana, sign up as a participant of Me-Made-May ’13. I endeavour to wear a handmade or refashioned item each day for the duration of May 2013. In addition, I endeavor to make a pair of pants or skirt (hopefully both) in May 2013.’

In honour of accepting this challenge, I’ve decided to give you a brief history of my sewing experience. Read on if you’re interested.

I’ve only been blogging since the beginning of the year, but I’ve been sewing for much longer than that. I’ve been sewing since junior high, and my first project was a pair of boxer shorts, which I finished so quickly that I was able to do a second project, which was a little bag that looked like a miniature gym bag  (I still have it back at my parents house filled with old makeup). The following year, I chose a more challenging project, which was a stuffed bear, which I gave to my Oma when I was finished.

In high school, I made several garments for myself. My favourite was a pair of wide-legged trousers I made from bright turquoise corduroy. The pattern I used was vintage, and was missing the fly pieces, and not knowing anything about putting in a fly, I just attached a zipper like you would to a skirt, not even lapped! But I lived in those pants! They were so comfortable and I got loads of compliments on them at school.

I kind of commandeered my mom’s sewing machine, so for my graduation present she got me my very own sewing machine. Yup, while my classmates were wishing for new cars, all I really wanted was to sew! My first job was at Fabricland in Calgary, a job I started in my last year of high school (mainly to pay for gas) and kept about a year after I graduated. I went on a trip to Europe after that a few months later when I came back, I found a job at another fabric shop! It was during these  years of working at fabric shops that I accumulated a lot of what’s in my stash.  Not that our employee discount was so great, but we could always watch the sales, and know when nice fabric was being marked down for the bargain basement.

Anyway, fast forward a couple of years and I find myself in The Netherlands studying for my bachelor’s degree, during which time I sewed a few small projects using the sewing machine belonging to my boyfriend’s mother. I hadn’t had my own sewing machine for about 5 or 6 years, so in realizing that I probably wasn’t going back to Canada, I took my sewing machine back to The Netherlands with me one holiday. I bought a special converter for it and everything so I wouldn’t fry the insides and I’ve been using it ever since, sometimes on a daily basis, and since I’ve started blogging “regularly”, definitely every week!

Now that Me Made May is in sight, I immediately see the holes in my sewing wardrobe, namely no pants that I’ve sewn myself. I made tons of pants back in high school, but I’ve grown (wider, unfortunately, not taller) since then, and haven’t sewn pants for myself since, I think. Ok, that’s not entirely true, I made a pair of leggings a few months ago that turned out horribly. They were designed for teenagers, I think. You know, the thin ones who wear everything on their hips. I know I did at that age. Nowadays, if I wear pants on my hips, I also have a bad case of plumbers butt. Yes, I admit it! And muffin top. We like muffin tops to stay on our muffins, not on our pants.

You may see a pattern going on in my blog so far, that is, I like to make dresses and tops, which is why I’ve also challenged myself to make pants and a skirt next month. Right now, surprise surprise, I have a top and a dress on the slab, and if I can squeeze it in, I also want to make a party dress for an event next month. My sister-in-law is also due at the end of the month, so I want to make her a Perfect Nursing Top as well. But I did recently cut out the Kelly Skirt and the Thurlow Trousers. These are definitely on my to-do list.

I am going to visit my parent’s in May, so I’m hoping that when I pack, I will be able to choose a travel wardrobe filled with self-stitched items. I was already going to challenge myself to take a small amount of clothing and mix and match when I get there. My sister has already told me that I can use her fancy new sewing machine and her Fabricland membership while I’m there, so I might have to take those patterns with me and whip them up there. Also, I should have a look for some photos of those awesome corduroy pants to show you guys!

For guidelines and to sign up for me-made-may, visit So, Zo…’s blog.

Sureau reveal and a giveaway

Image

Hello everyone. Today I am revealing my Sureau dress to you. And I also realized that my blog has been around for a whole year! I’ve only really started blogging the last few months, but still… It warrants a giveaway, don’t you think? Sorry, the giveaway is now closed. First, the reveal.

ImageI love how the style cinches in my waist. I cut a size 40 for the top and a 42 for the skirt. I also added 4cm to the bodice to make the seam lay on my waist. I could have even added another centimeter.

Image

I used a 100% cotton fashion fabric I found in the outlet section of my local fabric store, Jan Sikkes. It cuts and sews up beautifully, and even has a little bit of stretch to it.

Image

I’d like to give a shout out to the coffee shop blog for this awesome photoshop action.

Image

Isn’t the strawberry button the cutest?!

ImageAs you can see from the two photos above, the bust area is a bit of a problem. I took the one above after I lifted my arms and pulled the dress back down a bit. The facing doesn’t lay flat on one side, and it kind of bubbles on the other side.  I unfortunately have no idea how to fix it, and standing completely straight and with my shoulders back doesn’t make me excited. Maybe I need to move the underbust darts down?

sureau giveaway

 Would you like to make your own Sureau? You have a chance to win this pattern! Just leave a comment telling me about the fabric you’d like to use to make it. The contest is open to anyone in the world with a mailing address. I will choose a winner in one week and will announce the winner on 15 april 2013.

Sorry, the giveaway is now closed.

A bombardment of stashbusting briars Part 2 of 3

Welcome to part 2 of my stashbusting briars. If you want to make your own, order the briar pattern here.

Briar0

Version 2: 3/4 length sleeves

For this version, I added 3cm to the length. I had added 2cm to the long sleeved one, but I wanted to make the hem a bit wider, thus the extra centimeter. I’m not crazy about the neckline facing in this one, not the facing itself but just the way it drapes on me. I like the one on the long sleeved one better, which I did with a needle.

briar1-2

briar 1-4

briar1-3

The unflattering but necessary back view.

briar1-1

I think I was channeling Amanda from Bimble and Pimble in this one.

click here for part 1

click here for part 3

A bombardment of stashbusting briars Part 1 of 3

I am sitting on the couch in a ray of sunshine and I can barely see my computer screen but I don’t care! Even though the temperatures are low, the sun offers a promise that spring is around the corner if I’m just a wee bit patient.

Briar0

Briar is definitely my favourite pattern at the moment. I only had time to make one in February for the sewalong, but now that I have a bit more time, I’ve been whipping them up like nobody’s business!

They probably take about 2 hours in total (a little more than two episodes of your favourite show) to make, including cutting out the fabric. There are only 4 pieces: a front, a back, and two sleeves, and because it’s made of jersey fabric, there’s no need for zippers. The only zipping you’re doing is zipping through this project!

I don’t have a serger, so I used a zigzag stitch for the seams and then trimmed them down to about 0.7cm (half of the seam allowance). And the hems were done with a twin needle. This is a must for sewing with jersey/knit fabric in my humble opinion!

The only other thing I’d say is to PRESS THOSE SEAMS AND HEMS. It’s recommended in the instruction booklet, and you should take it to heart.  I kept coming out with wavy hems, for example. I stretched them out a bit, then pressed them, and the tops look just like they came off a rack.

I’ve broken this post into 3 parts, one for each version of the briar. The other two are 3/4 sleeve and short sleeves.

GET READY FOR LOTS OF PHOTOS!

Version 1: long sleeves

For this version, I added 2 cm to the length of the top and I finished the neckline with a twin needle, just like with the hems.

briar2-1 velvet truffle

briar2-2

briar2-3

briar2-5

briar2-4

Click here for part 2

Click here for part 3